

Authentication Seed Registration to Google Authenticator(for smartphones)
Note: The multi-factor authentication settings you do here are required every time you log in with your Nagoya University ID. Do not delete the authentication app or the settings you have made.
The following is a video explaining how to set up on the authentication seed management page
【movie】Authentication Seed Registration to Google Authenticator(for smartphones)
Google Authenticator Setup
Install Google Authenticator onto your smartphone from Google Play (Android) or the App Store (Apple).

Setting up for the first time
Access the Authentication seed display page at first login to display the authentication seed and QR code. In this case, proceed to Procedure to register an Authentication Seed to Google Authenticator)
Re-setting/Second time and later settings (on-campus network only)
When accessing from Authentication seed management page for resetting or setting multi-factor authentication for the second time or later
Get Authentication Seed
- Log in to the Multi-Factor Authentication CAS Authentication Seed Management Page with your Meidai ID and password.
- This page can only be accessed from the campus network for security reasons. (*On-campus network refers to computers connected to the on-campus wireless LAN NUWNET and wired LAN used on-campus.)
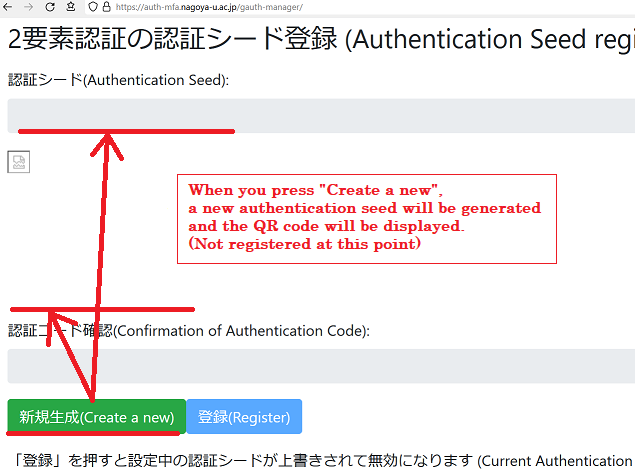
- If you click the "Create a new" button, a new Authentication Seed will be generated.
- You cannot display a previously used Authentication Seed. Similar to other password reset procedures, you can only generate and register a new Authentication Seed.
-
The generated Authentication Seed will be displayed as both an "Authentication Seed" (consisting of alphanumeric characters) and a "QR code".
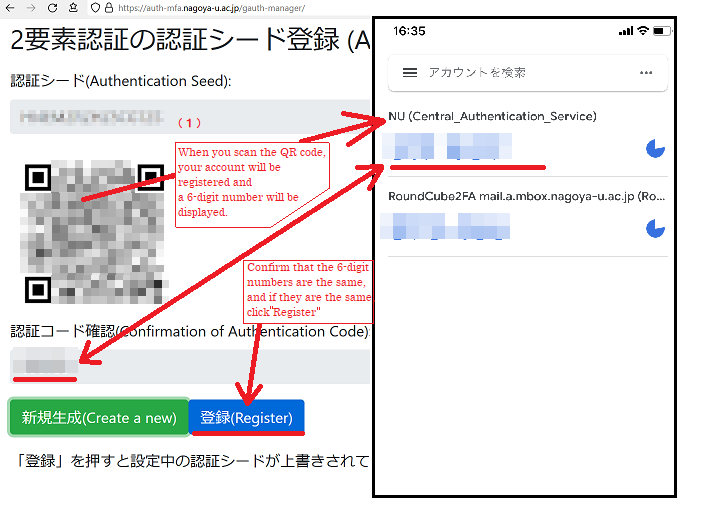
(1) Register the seed value in the app according to the item of "Procedure to register an Authentication Seed to Google Authenticator" below.
(2) Confirm that the 6-digit numbers are the same, and if they are the same, click Register -
The Authentication Seed will not be registered to the CAS server until you click the "Register" button on the Authentication Seed Management webpage. After you register the Authentication Seed to the Authentication Application, please remember to click the "Register" button to register the Authentication Seed to the CAS server.
- Even if you mistakenly generate a new Authentication Seed, the previous Authentication Seed will remain as long as you do not click the "Register" button. Be sure to close the Multi-Factor Authentication CAS Authentication Seed Management webpage without clicking the "Register" button
Procedure to register an Authentication Seed to Google Authenticator
For first-time users of Google Authenticator
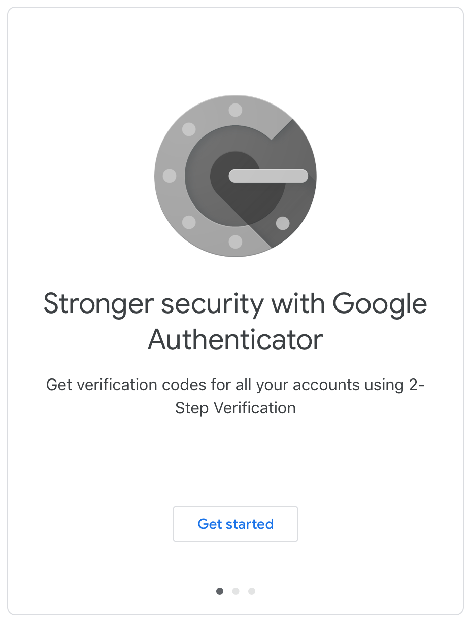
- When you start Google Authenticator, you will see the following screen. Tap "Get started" to proceed.
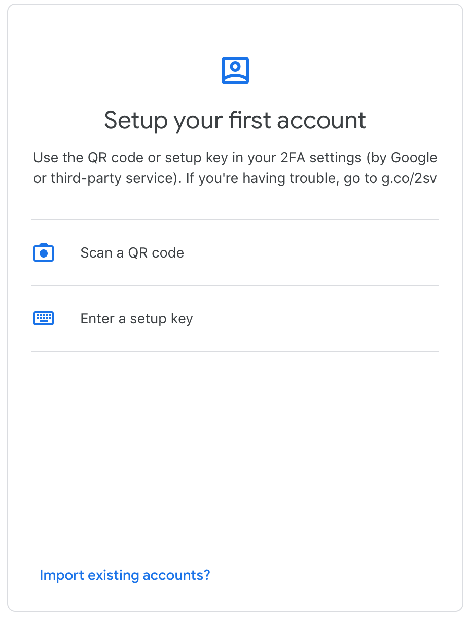
- Next, a screen to select a method to register your Authentication Seed will appear. Select "Scan a QR code".
- You will receive a notification on your smartphone, "Authenticator requires permission to use your camera". Allow it.
For people already using Google Authenticator
- After starting Google Authenticator, tap the "+" mark on the lower right-hand corner of the screen and start the registration of a new Authentication Seed.
- Next, a screen to select a method to register your Authentication Seed will appear. Select "Scan a QR code".
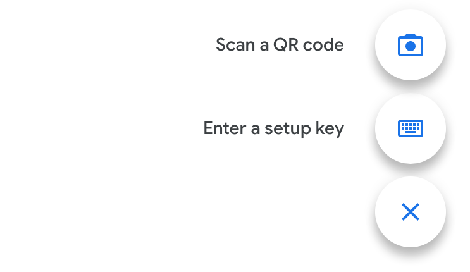
Authentication Seed registration with a QR code
- If you choose "Scan a QR code" with a smartphone that has a built-in camera, a QR code scan screen will appear. Scan the QR code displayed on the Authentication Seed Management webpage.
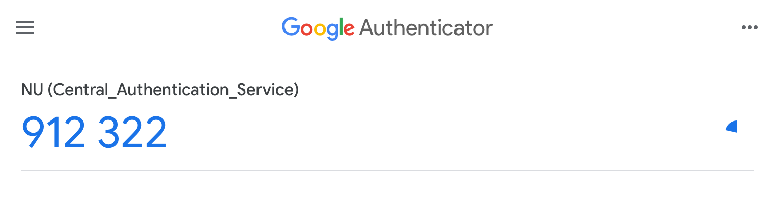
- The Authentication Seed will be registered as "NU (Central_Authentication_Service)".
- Confirm that the 6-digit number displayed in the "Confirmation of Authentication Code" field on the Authentication Seed Management webpage is the same as the one shown on Google Authenticator.
- If they are not the same, the time on your smartphone may be greatly out of sync.
- Confirm that the 6-digit number displayed in the "Confirmation of Authentication Code" field on the Authentication Seed Management webpage is the same as the one shown on Google Authenticator.
-
(In the case of re-setting/setting after the second time) After confirming that the 6-digit number displayed in the "Confirmation of Authentication Code" field is the same as the one shown on Google Authenticator, please remember to click the "Register" button on the Multi-Factor Authentication CAS Authentication Seed Management webpage and register your Authentication Seed to the CAS server.
- After registration, you can confirm that multi-factor authentication is possible with your Nagoya University ID account from this Multi-factor Authentication CAS Authentication Test Page. Please give it a try.
Authentication Seed registration by manually inputting the Authentication Seed (Setup Key)
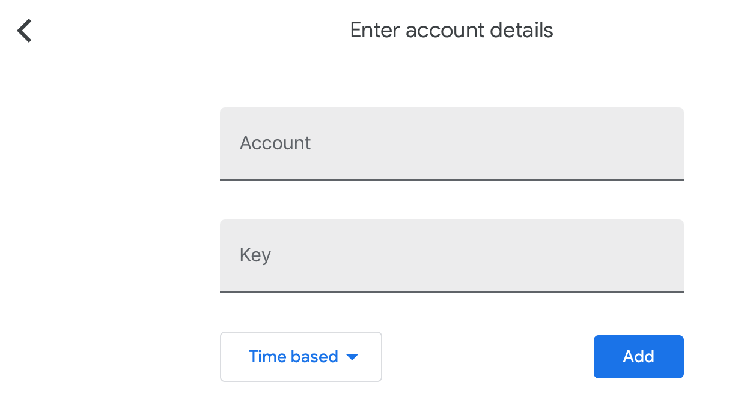
- If you select "Enter a setup key" when registering a new Authentication Seed, the following Setup Key (Authentication Seed) registration screen will be shown.
- Set an "Account name" that you can remember.
- Do not use an account name that is easily identifiable as being connected to your Nagoya University ID.
- Select "Time based" for "Key Type".
- Input your "Authentication Seed" in the "Key" field.
- The authentication is not case sensitive, so you may input alphabetic characters in lower case letters if you wish.
- It may be difficult to distinguish between characters like "0" (zero) and "O" and "1" (one) and "I", but feel free to input them as you like since those characters are handled as the same.
- Set an "Account name" that you can remember.
- Confirm that the 6-digit number displayed in the "Confirmation of Authentication Code" field on the screen is the same as the one shown on Google Authenticator.
- If they are not the same, the time on your device may be greatly out of sync.
-
(In the case of re-setting/setting after the second time) After confirming that the 6-digit number displayed in the "Confirmation of Authentication Code" field is the same as the one shown on Google Authenticator, please remember to click the "Register" button on the Multi-Factor Authentication CAS Authentication Seed Management webpage and register your Authentication Seed to the CAS server.
- After registration, you can confirm that multi-factor authentication is possible with your Nagoya University ID account from this Multi-factor Authentication CAS Authentication Test Page. Please give it a try.
TIPS "About Backup"
Open the menu from the three-point reader in the upper right corner of the application screen and select "Export Account".
Save the QR code for data transfer by taking a screenshot, and store it in a safe place.
At that time, please note that you will be asked if you want to "delete the exported data.
To restore the data, use Google Authenticator's QR code reader to read the QR code that you have stored.